Article continues below this Ad
This is my bonus tutorial tutorial to show one way of sewing 2 prequilted units together of my Grandma's Kitchen quilt.
BONUS Tutorial
My bonus is how to cover the seam when sewing two prequilted units together. This is often called 'Quilt as You Go' or QAYG. There are a lot of ways to think about this and accomplish it. I'm showing one very super easy way that works very well for this project.
I went with the simple method as there is no sashing for this project and the rows don't line up a certain way to the one below. So it's a perfect quilt go simple!.

I decided to quilt all my pieces right out to the edge. I know I mentioned to leave some space, but let me tell you why I changed my mind.
If your quilting designs for a section is continuous across it, that means you'd have to figure how how to 'not quilt' parts to do after the 2 sections are attached. Then once attached you'd have all this bulk to rotate in your quilt.
I decided that I didn't need that kind of precision for this quilt and I would just quilt out to the edges.
- This photo is the TOP TWO sections, and that is the BOTTOM EDGE, you can see the dress is going the correct direction.
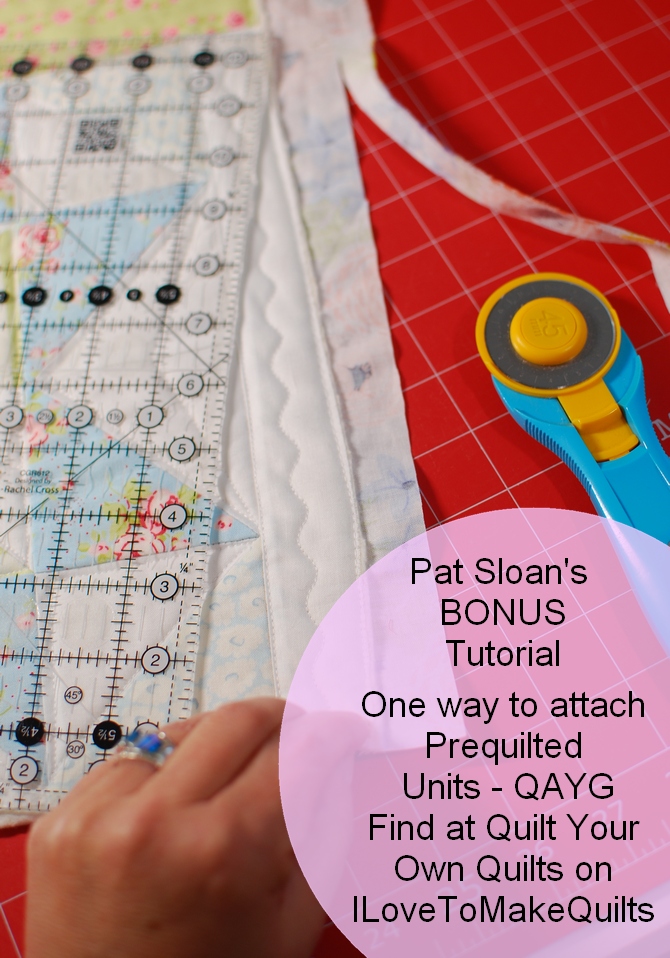
- TRIM away the backing AND the batting even to the quilt top. Do on the BOTTOM edge and BOTH SIDE Edges.

This is the 2nd unit, which is the 3rd & 4th of my Grandma's Kitchen. You might be sewing single rows. You might be sewing on a border, It's all the same process. It's a row of some width.
This tutorial is to show you one way to cover the seam. I'll be using the backing of the 2nd unit to cover the seam.
- On the TOP EDGE, Trim the batting even with the top
- Then trim the backing leaving 1" which will be used to cover the seam where we attach the two pre-quilted units.
PITFALL/Solution - What if I didn't leave enough backing? You can cut a 1.5" strip, press under 2 sides, then applique that over the seam. It means sewing on 2 edges instead of one.

This is what you have and you are ready now to sew these 2 sections together
I did a video for you
Let me know if the video helped explain it

Next is to line up the 2 sections and sew the seam
I did another video on that

The steps
- Place the top section onto the middle section, right sides together
- Mark center point on both sections with a pin
- Line up the ends & center point, pin together
- Check for points, and pin so you know where it is so you don't chop off points
- After the 2 sections are pined, sew together with the TOP section facing you so you don't catch the 1" backing in your seam


Covering the seams and I did another video
- PRESS the seam allowance to the towards the TOP section so you can use the 1" backing on the Middle section to cover the seam
- I use steam and really compress the seam. I have a thin batting so when this is washed you'll never notice it
- Flip over and press from the front too
- Turn under the 1" backing by 1/4" and Hand stitch to the top section.
- I glue baste it so I don't have to deal with pins
PITFALL/Solution – So the bulk REALLY Matter? If you have a thick batting it might. Or maybe you really want to have it less bulky. In that case do the following
- Press the seam open to spread the bulk to both sides
- trim away a bit of batting
- AND then use a separate strip to over the seam instead of using the backing of a section.

And there is how i do it!
This post got VERY long. Let me know if the videos were helpful in the comments below
Additional Resources
- Jera's book -
- Carolyn's Book, she has two.
One more Assignment coming for ideas to quilt the 3rd section
- I will also share more photos of the blocks quilted in section two. This post got too long to do it all.

What Do I need again?
- Purchase a copy of my book 'Teach Me to Machine Quilt' … A Physical Copy .. or a Kindle Version .. or a PDF from my publisher's website
- A Quilt Top or a Quilt Panel
- Batting
- Backing fabric
- Thread
- Basting Spray or Pins with a Kwik Klip
ALL the Posts incase you missed one
Article continues below these Amazon Goodies
37 Responses
I’m just about ready for this step. This is what I envisioned the final steps would be. I love that the block corners and points don’t need to line up on the rows. This layout is perfect for quilt as you go.
The videos are very helpful as I could not picture how the seam joining area would look on the back. I haven’t finished all the blocks yet but have rows 1 and 2 put together so may start quilting them before the blocks are all done.
This has been a great help, thanks Pat. My Solstice is still sitting in sections waiting for me to figure out how I am going to get it all together! Though it won’t be as straight forward as quilting rows, I think I might have the confidence to put the sections together now.
Thank you so much! The videos and pictures were a great help. I am getting ready to sew my sections together! I did two Grandma’s Kitchen! One is made out of the practice squares I did and the other is made out of the Fluers material. I was thinking about sending that one to the long arm quilter but I think I am feeling confident enough to quilt that one too!
I appreciate the time you took to write instructions and do video’s. That really helps. Thank you!
I like how the videos would just pop out and go back to page when done. Excellent!
The instructions are very clear as always and the videos are a great help as I’m a visual learner. Thank you for sharing your great knowledge with me. You a huge wealth of information.
Hi Pat! I found both the videos and the written instructions very helpful. As someone who’s not yet quilted her own quilts your instruction is inspiring me to give it a try and I thank you for that! I look forward to your emails and all of the projects that you have both in the present and past. Thanks for the great website and wonderful instruction!
Pat, your video was very good and it was helpful to see how you did this. Thanks so much.
Gwen
Thank you for the videos.
Fabulous tutorials. To include the written directions, pictures, AND videos was over-the-top for explanations. Thank you!
Carol your tips should not be too close to the edge. They would be chopped off no matter what technique you use. Start with it being accurate and you’ll be fine
Pat thanks so much! Your bonus tip is great!!! So clear and easy. I like them both, videos and reading. THANK YOU!!!
Pat, I really liked the videos. I was doing it a different way but am going to try this one. One question: if the tips of your points are too close to the edge how do you sew the two quilted pieces together without cutting off the tips? maYbe you covered it in the video so I need to watch it again, but this way seems a bit easier than others I’ve tried.We’ll see. thanks for the videos!
you are welcome LuAnne
VERY helpful! I am such a visual learner. THANK YOU!!! 👍🏼
thank you Barb, I’m glad it helped. it was a lot of extra work
you are welcome Karen
you are welcome Max
You can do it!
thank you for the feedback Chris
I’m glad it helped Dianna! I am not doing a Craftsy class, that is another designer
Thanks for doing both. I agree, they compliment each other. I realize that takes more time so it is really nice of you to take the time to help us all out with both. You are a fantastic educator..
Both written and video tutorials are very helpful. I would say that they compliment each other. After watching the videos, the written part is much more understandable. Thanks for doing both!
Great info Pat. I’m putting mine all together first so wish me luck,!
So helpful–thanks
I really enjoyed the visual techniques. Now when I read through the instruction I can relate it to what I saw. You mentioned using a thin batting. Is there a specific brand that states it’s thin or is it just a matter of finding a batting that feels thin enough?
On a side note, I have learned so much since following you. I love this legal stalking concept :). You and all your followers have brought back the oomph I needed to get back into quilting.
Thanks
I am very visual so the videos were a great help. I am excited to begin QSYG. Thank you soo much for this help. I just signed up for your Mystery Quilt Class on Craftsy.
The videos are terrific. Everyone learns differently, so having written and visual instructions help everyone! Thanks for all you do for us.
If you want a full workshop online Michelle, take the one I recommend
thanks Margaret
I am a visual learner. So the videos are extremely helpful! New to quilting – bought your book and was looking forward to this tutorial, and can’t wait to try this.
You made it very clear. Thank you!
Thanks for the feedback Ann.
Thanks for the feedback Jackie.
I did like both. It is handy to have the video to watch as I am actually doing the quilt. I also like to read through a tutorial before doing the project.
I thought the videos were a tremendous help. To me, reading a list of instructions gets very confusing very fast. Seeing it in these short videos cleared everything up immediately. Thank you so much!!