
Article continues below this Ad
Today I'll show you what I'm quilting on the middle 2 rows of my Grandma's Kitchen quilt.
Assignment #4
Since I've written an entire teaching book on how to quilt your own quilt, we'll be using that as our tutorial, and I'm quilting my Grandma's Kitchen quilt with my walking foot in rows which is very manageable for any size machine.
I have a few tricks to show you below for EASY and super cool looking walking foot quilting.

Here is a photo of my Lines and cross hatches in progress, with some fun fill in areas.
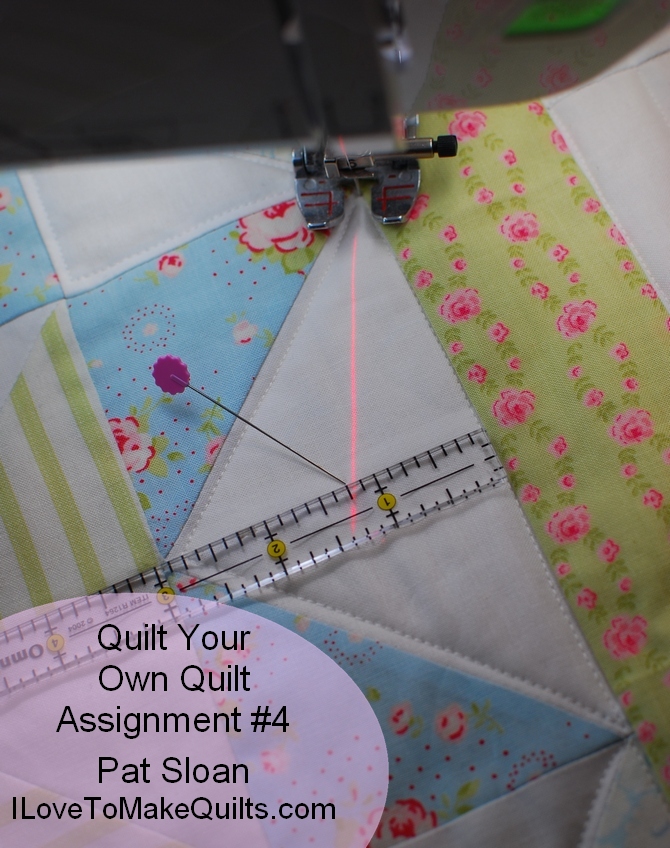
Let me show you an easy way to use a little ruler & a pin with your guide beam to get effective line placement.

My Babylock has a built in guide beam that I use a lot to help me. This is a Destiny II, the Crescendo also has it. Visit your babylock dealer to take a look at how they work.
- Use a common point to measure from, I'm using the outside edge and this tiny ruler to mark the 1 1/4" spot along that seam
- Place a pin at the seam and aim the beam for it.
PITFALL/Solution - If you don't have a beam, you an use a hera marker to 'crease' the fabric. Or just do this in short segments and keep your eye on the pin, you'll be able to sew there in a pretty straight line. Once it's washed it will all crinkle and be wonderful!

When you get to the pin you will pivot.
Don't sew over the pin!

Now aim toward the edge.
Sew along to create a cool straight line design in the background

Doesn't that outline look great! I LOVE it and so easy with a tiny ruler and a pin.
I'm in the process of quilting the center pinwheel.
The green will be quilted down the middle just like the white sections was


Have you ever had a 'weird' bend like the one on the seam between the arrows?
Do you know what causes that?
It's your seam being pressed in two different directions. The upper part is pressed to the right, and the lower to the left. The odd 'bend' is where it's folded underneath.
PITFALL/Solution – So does this REALLY Matter? When you wash the quilt you will no longer even be able to find this. BUT if you intend to enter your quilt into competition, then be sure you don't have any of that. In competition you are judged on your highest level of excellence. All other times, wash the quilt and love it, that is all it needs!.

Another tip for you. While sewing in sections, be sure your backing edge does not fold under. I constantly check that it's pulled out to the side. It's no fun to have to unpick because you sewed it to the back!
Article continues below these Amazon Goodies

I'm continuing to do a lot of line echos and grid work on most of the blocks in rows 3/4 that make up the 2nd unit I'm quilting

TIP – when you get to the edge, I do a little locking or back stitch to secure.
If this backing is the one I'm using to cover the seams, then don't sew out into the backing, I end right near the edge of the quilt. If I sewed into the backing then when I fold it over to cover the seam, there would be all these threads to deal with.

This is what I have so far. I'm changing to pink thread and quilting in more grids or straight lines for the rest of this section.
Click the photo for a larger image.
Article continues below these Amazon Goodies
What now?
- I will have the BONUS tutorial of how to sew the 2 sections together on Saturday Jan 20.
- If you don't want to quilt your Grandma's Kitchen to try it, get two quilt blocks quilted so you have something to test with.
- I will quilt the 3rd section of rows 5 & 6.. but that will be a bit later as I have some other projects.. like "In the Summertime" Wed Sew along to do. I will take a photo and draw on it my plan for the last 2 rows. That you have some guidance. I'll have that on Saturday as part of the bonus

What Do I need again?
- Purchase a copy of my book 'Teach Me to Machine Quilt' … A Physical Copy .. or a Kindle Version .. or a PDF from my publisher's website
- A Quilt Top or a Quilt Panel
- Batting
- Backing fabric
- Thread
- Basting Spray or Pins with a Kwik Klip
ALL the Posts incase you missed one
16 Responses
I don’t see anything mentioned about binding the edges of the quilt. Are you leaving batting/backing beyond the edges for this?
Yes it does! Thank you for your clarification
Mary Ellen Perry- I got my little laser light at “Harbor Freight.” It was not expensive. Then I got some small square patches of hook & Loop tape at JoAnns. Also not very costly. (I think I have less than $10 in both items.) I still don’t have the light attached to my BabyLock Aria, but after seeing how well they work, I’ll be installing it tomorrow! Good luck finding what you need, and getting it working for you! : )
I’m so glad you loved my posts Lisa! there is so much you can do with your walking foot!
Hi Maria! I use https://translate.google.com/ to read your messages, you can use it to copy and paste my instructions
I am so happy it helped you Roseanne!
Nancy my book is NOT a Quilt as you go. My sew along is ‘Quilt your own quilt’ and on Jan 20th I have a BONUS tutorial. BUT .. you really should have my book as 99% of what you do is quilting part, covering one seam is really minor to the amount of thought & work you do to quilt
Leah you are correct. I decide to do what I normally do and go right to the edge. On saturday I’ll talk about the reason and differences. I changed my plan. which.. happens to us all doesn’t it?
Thank you Mary Ellen! The laser is built into my BabyLock machine and has full controls. Visit our local dealer or test drive at a show!
Pat,
Thanks so much for your guidance on how you are quilting each block! I have not gotten the hang of FMQ so most of my quilting is stitch in the ditch. What you are showing here adds more quilting possibilities! TY
Hola Pat, me gustaria encontrar las instrucciones en español, ya que me cuesta bastante el ingles, hay muchas palabras que no entiendo, de todas formas quiero darte las gracias por tus explicaciones, me encanta como trabajas y lo bueno que haces por compartir con toda la gente que nos gusta e iniciamos en esta andadura tan hermosa. !Gracias de nuevo ! por tus enseñanzas, saludos desde España, concretamente desde Murcia.
Try Harbor Freight…
Hi Pat,
I am so thankful you are sharing this information with us! I often wonder how to quilt both individual blocks as well as the overall look of the quilt, so these articles are so informative. I am going to read each of these articles multiple times and PIN it for future reference. This is SO fabulous. Thank you again! ~smile~ Roseanne
Does your book cover methods to do Quilt as you Go? I hope so but please let me know… I see this book in my library soon!
Pat thank you very much for this lesson on how you are quilting this section. I do have a question though. In an earlier lesson, I vaguely remember you stating that in this section we would stop quilting at about 1 1/2″ to 2″ from the edge. In this lesson I think you’re stating to quilt to the edge but not off the edge of the top. Is this the correct understanding of the lesson?
Such great instructions, makes me want to jump right in and FMQ! When I can afford it, I’m going to get the book. ALSO, where does one buy the LASER pointer for the sewing machine? I’m putting that on the top of my wish list.