

We’ve had some discussion about an accurate 1/4″ seam allowance at my online group. It’s a GREAT discussion to have. When I learned to quilt I took a 12 week course and I learned block construction, how to draft, and why there IS basic math, grids, and accuracy involved in quilt making.
So it does matter that your final block is the size.
And it’s not correct to say they will ‘work out’ if the wrong size. Let me explain
If you are following a design, the sizes are there so that the quilt can be made properly. If you have a block, then a setting around it, if your block is too small or too large, it will not match the setting given. That means you will need to redraft the entire design to suit your incorrect block sizes. Or.. just make the blocks correctly.
Think of a puzzle. Each block is the size it is, so it fits in it’s slot. If you an a puzzle piece that is too small it won’t fill in the space allocated, right? Same with quilting.
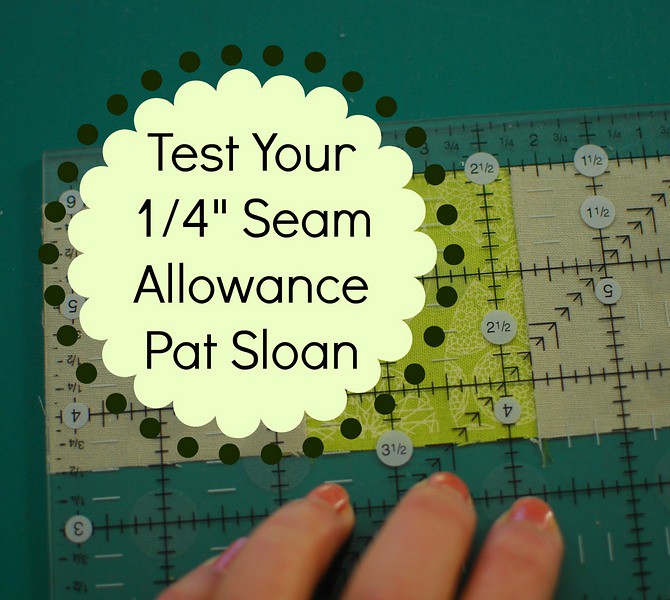
Nailing an Accurate 1/4″ seam allowance is the best thing you can do for your quilting skills.
I show you below how to determine your problem. In my patterns give you sub-measurements after sewing patches together.
If you are having inaccurate or inconsistent block sizes, then measure after each seam is sewn to see when and where the seam allowance is going wrong.
If you can get an accurate WRONG seam allowance, then you can get an accurate correct one too.
Even if you have a 1/4″ foot for your machine you still need to check because the way you feed the fabric, your line of sight, and maybe the foot itself, might be slightly off. Causing an inaccurate seam. So you might need to adjust your needle position, try a different foot, or use another tool to help you achieve that accurate 1/4″ seam.
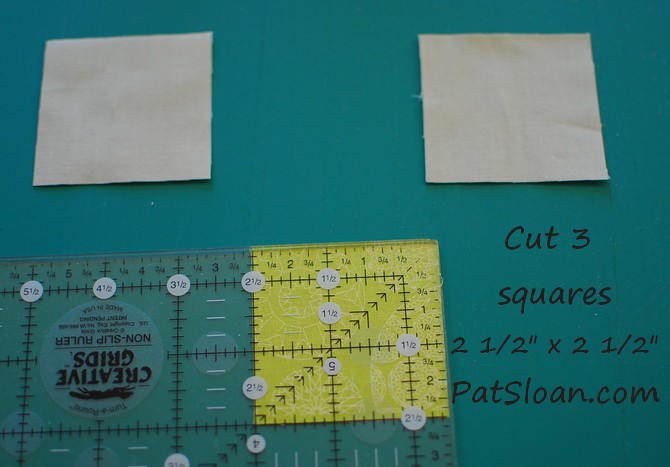
Here is my easy test to see if you are set up correctly.
- Cut 3 squares 2 1/2″ x 2 1/2″. Use 2 different color fabrics
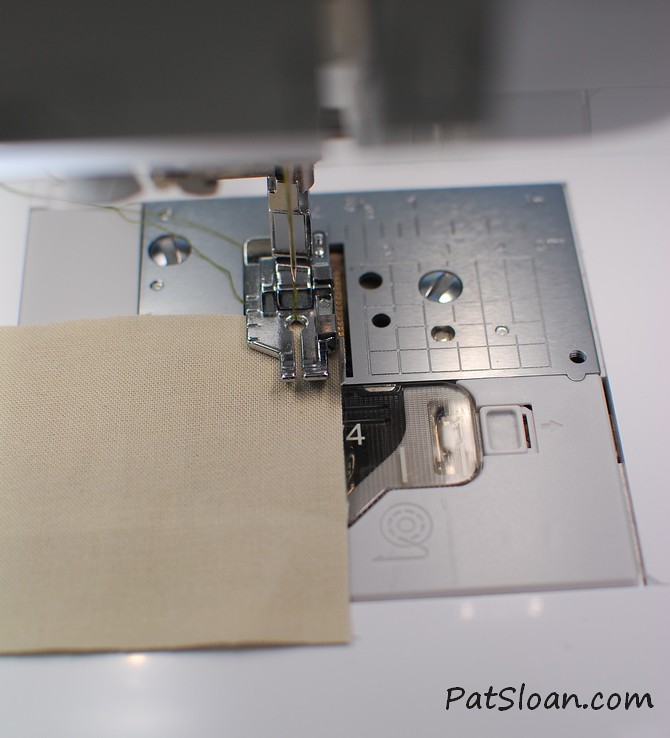
This is the 1/4″ foot for my Babylock Destiny II.
I love the guide on it. Your machine may have a different foot, or no 1/4″ foot.
Sew the 3 squares in a row, the the alternate color in the middle.


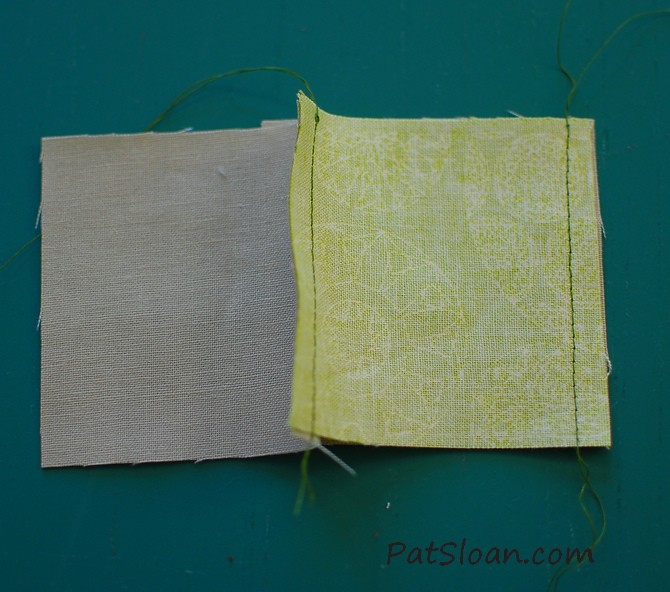
My Babylock’s 1/4″ seam foot sews a ‘scant’ 1/4″ seam. Do you see how the seam is to the RIGHT of the line. When you fold over fabric it takes up a little space, so sewing with a seam just ‘shy’ of 1/4″ is what works for many people, BUT your mileage may vary. So you need to test to see what is accurate.
I have this little 1/2″ wide ruler that i keep by my machine to check things.

Now press the unit so the right sides are up for all 3 squares. Do you see how the seam allowance creates a ridge?
This is before i pressed it. when you press you need to have it flat. That way as you sew the units together they all are at the correct size.
now let’s test it!
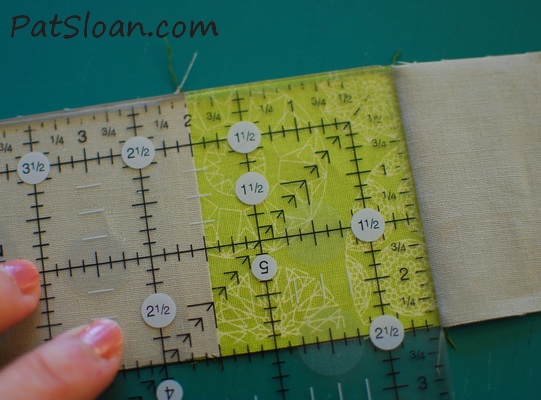
First I measure JUST the center block. It should be 2″ wide.

Now i measure the entire unit. It should be 6 1/2″ wide.
When I test I like to shift that ruler down and have a straight line across the top and bottom of the patchwork. There is a bit of a shadow on the top right, that’s even. You can click the photo above for a larger image.
If your block is not accurate, then you need to work on things to find that 1/4″.
- You can shift your needle to the right (although not with the foot I’m using).
- You can check your 1/4″ foot to be sure you HAVE the 1/4″ foot. Maybe you are using the wrong foot.
- If you don’t have a 1/4″ foot use another foot &, shifting the needle position should work for you. On one of my machines I used the open toe applique foot & shifted my needle position.
- You can put a layer of painter’s tape on the right hand side as a guide once you know the foot & needle position.
My 6.5″ rulers are the very best size for so many things. If you don’t have one get one soon!!
You can Buy the 6.5″ Quilting Ruler

New to my site?
- Join my newsletter
- Subscribe to receive my newest articles in your inbox
- Listen to my Podcasts
- Join me at my Facebook Quilt Along
- Join my FREE Sew Alongs!
- I have a TON of freebies and travel to teach HERE
- Find me at Instagram
49 Responses
Hi Pat. Thanks for the article about checking the 1/4″ foot. My foot was off by 4 needle positions. Correcting it made a huge difference in my block.
Excellent information. Your detailed summary of each picture helped me to understand what I need to do. I have depended on my 1/4″ foot always. I will test it now to make sure that it is right on target.Thank you so much!!!
Can’t wait to try this when I get home from a trip! Getting those seams the right measurement has been my most difficult part of quilting. I’m sure this will help.
This is an extremely useful article, I have saved it for future reference. I hope it will help my accuracy.
Thank you so much for all your knowledge that you share with us. This sure has helped me! I will refer to this often.
Thank you for the pictures to go along with your explanation. I understand the ‘scant’ 1/4 inch seam now. 🙂
TY for your tips accompanied by photos. I always do as you did and it was still off! I think my “scant” was a bit too generous! Great article!!
Ok, muito obrigado pelas explicações.
Very informative article! I intend to check out my 1/4″ seams since I often have discrepancies! Thank you, Pat!!
Thanks Pat. for another friendly reminder. I’m not always a great 1/4 sewing person but am really good at trimming down blocks.. so am glad your grandma sew along and soltace sew along give me a little to edge down when needed. I use an index card and line up on the edge of the foot then position my needle over one index card space instead of a plastic ruler but each quilter is alittle different. thanks for your time and great email post
And, yes, I use the quilting rulers as I did each step on the Be My Neighbor quilt blocks to see how they were coming along and how close I was when completing each step on them.
Just finished up 8 of the Block # 4 for the Be My Neighbor quilt. The bottom blocks section was perfect for testing out the 1/4 inch seams with the 3 hour glass squares across the bottom of it. Was pretty much right on in doing up these blocks. Reason for doing up 8 of them is that it is a sewing project in a sewing group. We were assigned blocks. We send them to one of the members who will be returning our assigned blocks so that we all receive 16 different ones in return. I also did up block # 14. The waves on the bottom of that one was another test pattern too. Actually, the whole blocks were test patterns for same. Had fun making up the blocks. I’m fairly new to quilting and the 1/4 inch seams, like about 3 years of it, whereas I’ve been sewing for close to 60 years all together. Sometimes I use the quilted blocks for other crafty things like pot holdrs, table mats, table runners, coffee mug mats, pillow covers, zippered bags, etc. I use the standard foot on the sewing machine and move the needle over to compensate for same on my Brother CS6000i with the quilting extended bed attachment that came with it when quilting. Also do same when sewing in zippers. When I learned to sew, there weren’t that many zipper foots around to use and made use of what we had in those days.
Great article-I am recommending it to my Project Linus group. I am in charge of our Block of the Month, and the information about scant 1/4″ is at the top of every pattern. It is so important for everyone to have blocks all the same size! Having your blog post is a great visual tool for us-I will definitely refer friends. Thanks!
I have a tool I bought that measures 1/4″. I have realized though that if I place my pen at different angles, I get a different measurement. Thanks for the info on how to ck it out. I tried to draw 1/4 inch on the seams I had to have for the solstice. It works, but because they are triangles, some of them came out a little wonky…
Your article (1/4″ seam) was extremely helpful. I had read your article awhile back and have been using it ever since. You have such great, helpful articles. Thank you, thank you. I am pretty much self taught-only started a year ago-but have taken some courses (online and at a fabric store (making one block). Plus I try to follow your sew alongs and make some of the blocks. You truly are a wonderful teacher. I appreciate all your hard work.
Thanks for the help! Great info to know.
Thanks for the reminder. I just got a new machine, and with the reminder, I checked my 1/4″ before I started sewing a bunch wrong. As it turns out, my 1/4″ was where I thought it was, but good to check!
Thank you so much for that useful info, you are a treasure.
Linda Wright
Pat, I am enjoying not only Grandmothers Kitchen but the fun of going through my stash to find fabrics that remind me of my Mothers Mother. She was the only grandmother I had. I spent many hours with her watching her piece and then drop her quilting frame from her living room ceiling and hand quilting her quilt. Watching her pull the thread knot into the quilt. Then the tiny even stitches following the pattern she had drawn on the quilt top. Looking back on this she had such a love for quilting and doing it right.
Thank you for the reminders of checking our quarter inch seams and how important it is. To enable us to put together a perfect quilt top.
Thank you for your love of quilting, teaching and sharing.
Bonnie Bussard.
Thank you! I’ve had a little help learning through a small quilt club . But now, I have learned so much since I’ve started following you. My blocks are coming out in the correct sizes now! Thanks.
Thank you Pat for a great article that we should all be aware of. I am a “self-taught” quilter and had issues with my 1/4 seam allowance on many of my projects before I clued in and checked my foot. It was off about a 1/16 of an inch. Once I adjusted accordingly, I usually get it right. I do believe that it is always a good idea to test the 1/4 seam before starting a new project! Thanks for all the wonderful info that you pass on to your followers. I really appreciate learning from your experiences.
Thanks for the info. Checked my machine out. It’s perfect. I also want to thank you for all the great quilt blocks and tips you share with us.
Yes your article helped me, I sometimes get carried away and go way too fast and that’s when my accuracy isn’t so good. Thank you!
Thank you so much for the info . My blocks from weeks 1&2 came out came out right . Weeks 3&4 are a quarter inch short . I was behind and did both of them on the same day . Since the first two came out right I didn’t bother to check again . Lesson learned. Those will be pillows and I will make 3&4 again . Thanks again
Hi Pat, that was a very good article about a 1/4 inch.. I am always amazed at people who thinks it will work out, quilt out or whatever.
May I ask you do the same type of lesson (article) about borders. I can’t believe how many experienced quilters just cut a piece and sew it on, too long it ripples, but it will quilt out, NOT, too short, again there will be issues with the top and border alignment.
Not only the fabric you are using but thread too, makes a difference in getting an accurate seam allowance. Do you use 40, 50 or 60 weight thread? I use all of those, depending on the project. This is such good info. Thanks for reminding all of us to check it before starting every project.
As a newbie I say who knew? I thought the1/4″ was just that. So thank you for this very important lesson.
Loved this article. Figured out I wasn’t sitting directly in front of the needle- that really threw my seam wonky
Hi Pat, Thank you so much for your instructions on the 1/4″ seam. I have been sewing for over 50 years and just lately trying my hand at quilts. I read and read and read your instructions and then printed it. Have it right by my machine now and practicing until I get it right.
Thank you for your 1/4 ” instruction. I do struggle with accurate blocks. Maybe more my unstable fabric guiding, cutting etc.as well as seam size. The smaller the block, it seams the more crucial. I’m working on some 4.5″ that are killing me. I didn’t starch the fabric, that may have helped also. It has the little 1 1/2 ” flying geese. I’m still pretty fresh at this. Your grandma’s kitchen blocks are so cute, I haven’t started it yet, but want to. I would never critique your instructions, I am grateful for them. I am diligently trying to work on last year’s projects. And have a new member challenge from joining the Tucson quilt guild Thanks for all you do, I love your talk show! I am using some of your ideas from your quilting book on a lap size Christmas quilt. You keep it fun! Thank you
As a matter of fact, I just checked my 1/4 and it was off oh so slightly. I have been using a 1/4 foot but now I have a piece of tape on my machine. Thanks for the hint.
Love the reminder – the up close photo’s are great.
Great article to review every once and awhile
I did read your article and I thank you for it. Everyone had said how great a 1/4 inch sewing foot was to I got one. Started using it and thought wow, this is great. In join your weekly sewing on Grandma’s Kitchen I discovered how wrong I was. The seam was too deep as it was for my other friends who joined me in this adventure. Nothing fit right. I took the foot off, put my regular foot back on, lowered my needle and measured from my needle to see exactly where my 1/4inch would end up. Then, on the half square triangles I used a 1/4 ruler and sewed just on the other side of the line (between the two markings) and it came out a hair bigger. So trimmed a little and now they fit great. Will be sharing with my friends your article and helping them get accurate too. Thank you. This journey is fun. Have never done this.
Thank you for this article. My first grandmothers kitchen block came out too small. Followed your directions for the 1/4 inch seam and now the blocks are coming out at 12.5 inches.
I see. Ok, thank you Pat Sloan.
hi Teena!
No that is not what i mean.
What you need to do is figure out YOUR machine, foot, line of site. This is what MINE is but you tools and you are different than me. This article is about learning what YOUR 1/4″ and i gave you a way to figure it out. Nobody should blindly use a 1/4″ or guides or anything without testing to see what is actually happening. There is no silver bullet, it’s about your equipment and testing it.
Thanks for the Great explanation Pat. I live in a senior community in the winter. I have been chosen to lead and teach the quilting group. The last 2 winters I have worked with the group. They are from all different levels. The first winter I realized the disparity of knowledge. I said I will be teaching a beginners quilt class. I ordered several of the feet like your babylock 1/4″. They work splendidly. They are available on Amazon and fit many machines. Students were much happier with their outcomes of quilting.
Drafting is probably one of the most helpful classes I ever took. It really changes how you look at a quilt.
I was excited everytime I completed a solstice block and they were correct size. Small things can be very exciting when they come together!!!!! Thanks Pat!
Pat Sloan, your foot does a scant 1/4″ seam and that made the inside block exactly 2″ and the whole set 6 1/2″. Does that mean that we should always sew a scant 1/4″ seam? When sewing the blocks for the Solstice Challenge, my blocks were coming out smaller than 12 1/2″ (unfinished). I checked my cutting, and I checked my seam and they were what they were supposed to be and yet the blocks continued to be smaller than 12 1/2″. Do you think it is because of not having a scant 1/4″ seam? And where can we find a scant 1/4″ foot? Thank you for your help.
It is also important to cut accurately. I place the line of the ruler on top of the fabric edge not to the left of it. This thread or two extra, combined with the scat quarter inch seam makes a more accurate block. Took me years to learn this. LOL.
Sorry for all the errors need to proof read!
Thaks PT, great tutorial and refresher for those of us who have quilted for years bot jump around to didderedt techniques and then return😉😉❤️💐
Thank you Pat for the reminder. for some reason mine always seem to have something wrong with them.
Thanks Pat for the close ups and the scant 1/4″ I’ve been having trouble and I’m going to have to redo the first block even by looking at anyone who’s a quilter can tell it’s been a friend of the stitch ripper. I am more accustomed to doing hand applique/ machine applique a lot of wool applique so this many pieces in a block has been a challenge I’d like to share pics but I don’t know how to upload pics from the phone to pc but I’ll get the piecing done cause I get obsessive until I learn something Thanks again Fran
Wonderful article. Thank you so much. I live in England and the Babylock machines have only just started selling here. You simply can’t buy a foot with a scant 1/4″. You can in the States and I have a Brother machine because I thought it would do what I needed when I purchased it 21/2 years ago. Only thing was because of life and my stopping doing anything and everything just after I bought it, it remained in its box until maybe 4 weeks ago. Upon opening it finally I found that you couldn’t actually move the needle like you could on my previous machine. But I’ve overcome this problem, but still couldn’t get a scant quarter inch no matter what I did. I bought this little gadget called a corner cut 60 and also some Q Tools sewing edge and finallyI have achieved exactly what I needed. All the money I’ve wasted plus the gadgets I’ve bought – don’t even ask. You see I have MS and have begun to shake, you’d think I had Parkinson’s – I don’t, but I really needed a stopper that went a long way up, and this does. If only I’d waited until now I could have bought a Babylock machine.
Great article an I’m hoping it will help many. It can’t be stressed enough how important this is.
Thank you again Ms Pat! 😘
Thanks Pat. I do have a 1/4″ foot for my machine but I do check it. It really does have to have the fabric correctly aligned and I do have to make sure I put it in the the right position when I’m looking down at the fabric. It’s always good to have a reminder.
Good to reread this and see the three squares put together. Gentle reminder. I am working on a jigsaw puzzle now. Redoing that would be no easier than making wrong size blocks fit together. Learned all this a long time ago. In one of my quilt guild projects a few years ago. We all made blocks in blues and yellows. I won the blocks in the drawing. My husband loved the colors. But only three blocks were the same size. Had to really work to get it together. No matching seems. No sharp points and etc. Some very small seams and some big ones. But it was completed and quilted and made a lovely quilt which my husband loved and it was his favorite lap quilt. Buuuuut a nightmare to put together. My daughter has it now and things it is lovely. Not seeing all the problems. Thanks again for letting us know that Yeah, it kind of does matter.