Article continues below this Ad
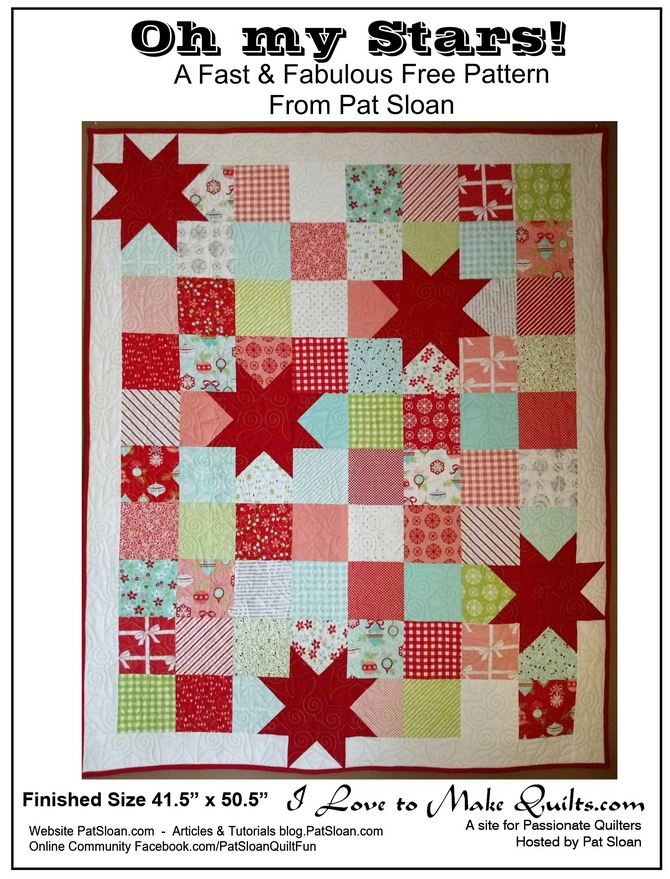
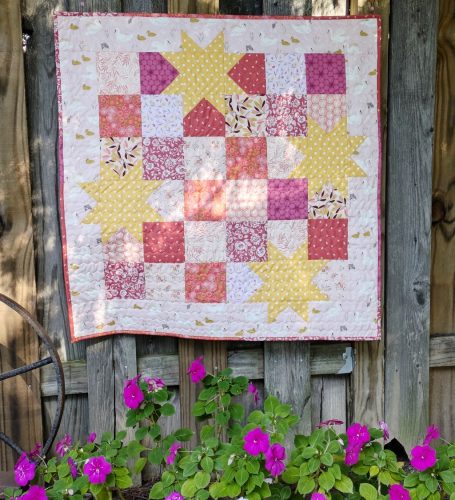
I have had this pattern on my drawing board for a long time and finally have it for you! I wanted a quilt that uses a charm pack plus a bit more. This is Vintage Holiday (from years ago). Let’s make a quilt to enjoy the gorgeous fabric and make it ‘quick’.
Supplies for this one
Below in this article is
- FREE wallhanging or small lap version HIGHLIGHTED IN PIN like this
- a Pattern add on for 3 more sizes.
- FREE table runner diagram
- FREE bonus directions for a wider border to float those stars
- FREE layout using just ONE charm pack + fabric
- photos and Videos!
*** Videos On Making the quilt***
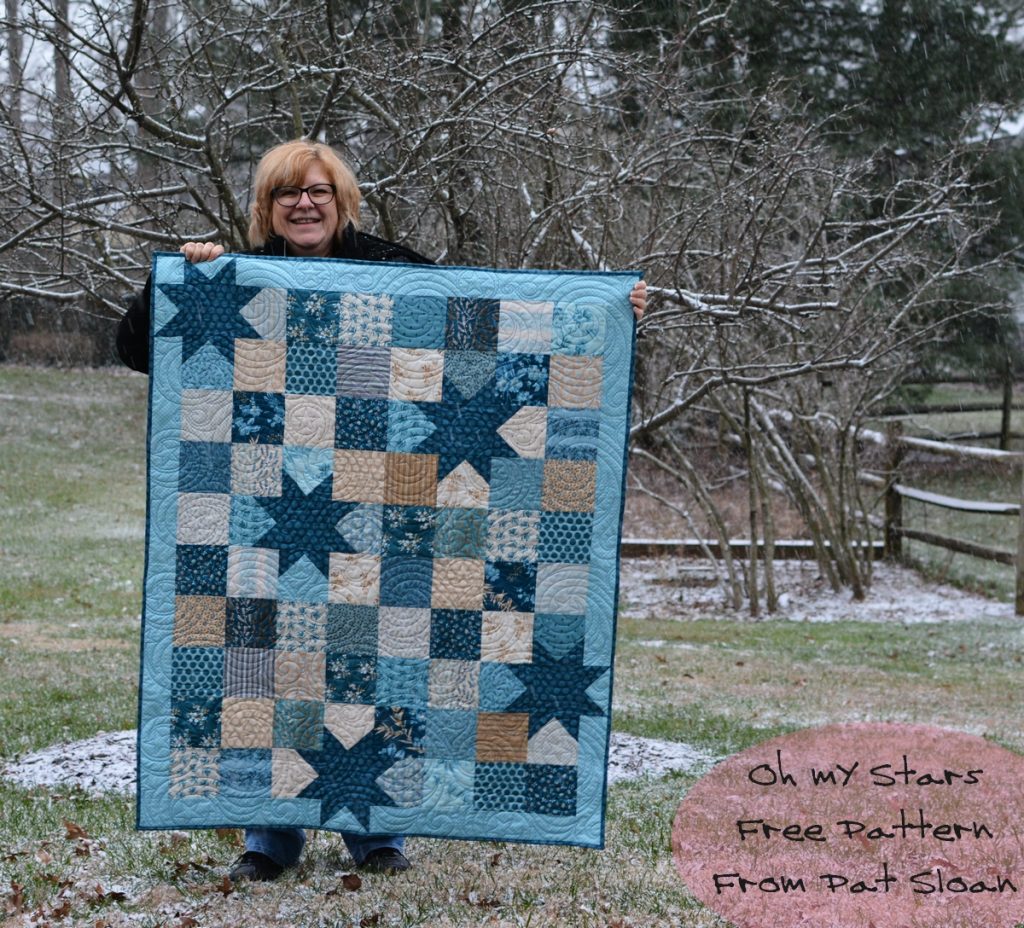
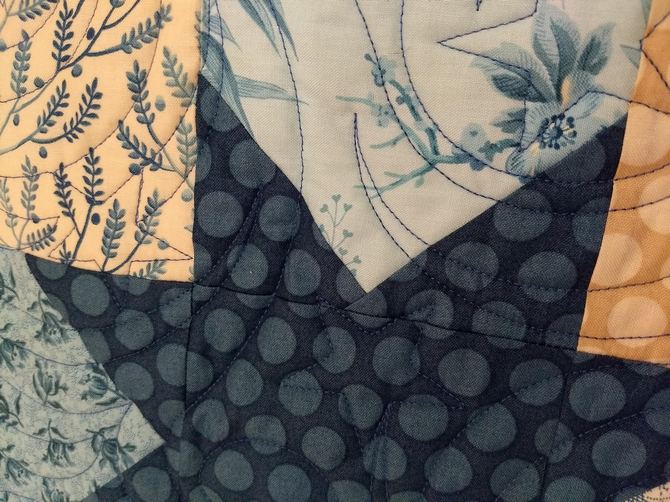
This one is done in gorgeous blue and tan!
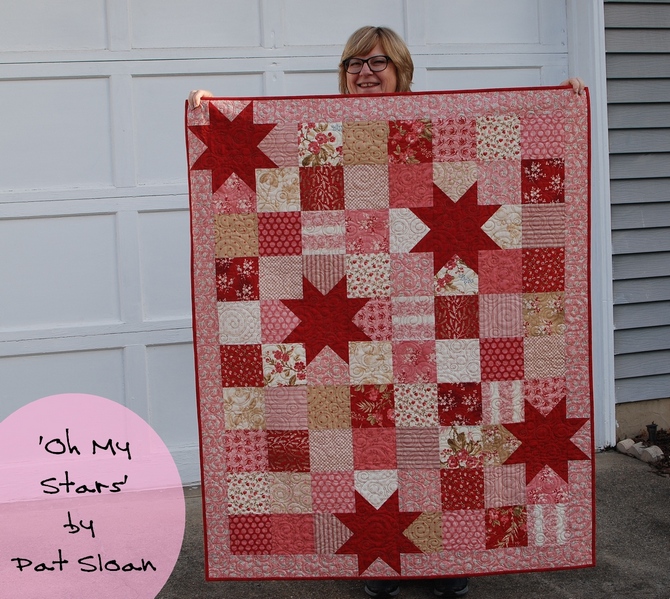
Ready for Valentines, this fabric line is so pretty!
PLEASE SEE PHOTO ABOVE:
The Stars float, this is the way I designed the pattern so it’s easy and fun! The point is NOT down at the base like traditional patchwork. This makes it very forgiving and a fun ‘floating’ star.
************************************
Supplies & Useful Tools:
- Charm Packs – Sale ones first there are some cuties!
- A Trimmer Ruler
Article continues below this Ad
**********************
Download my FREE Oh My Stars for the small version
Download Oh-my-charming-stars-4-wide-border-bonus-direction
FYI – the backing requirement is ‘frugal’. If you prefer more backing get 2.5 or 3 yds
**********************
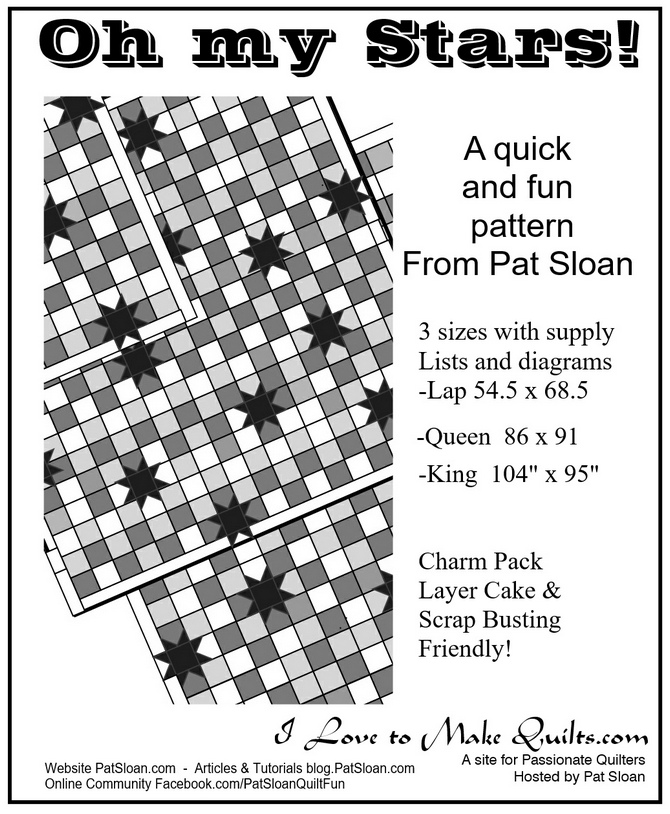
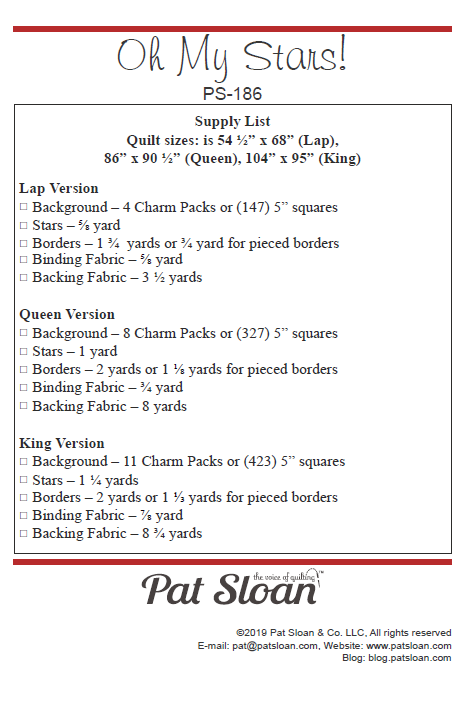
For $5.00 you can buy my add on pattern with 3 more sizes which includes the supply list and diagrams
Each time you shop via my links you support our small family business and we are honored to have you as part of our quilting neighborhood!

ERRATA: If you purchased prior to 1/22/19 at 10:00pm On the supply list change Lap Version Border Fabric to 1 3/4 yards or ……..
TIP: For those wanting to make the lap size into a twin
- Add a 2″ inner border then a 6″ outer border to the Lap size.
****************
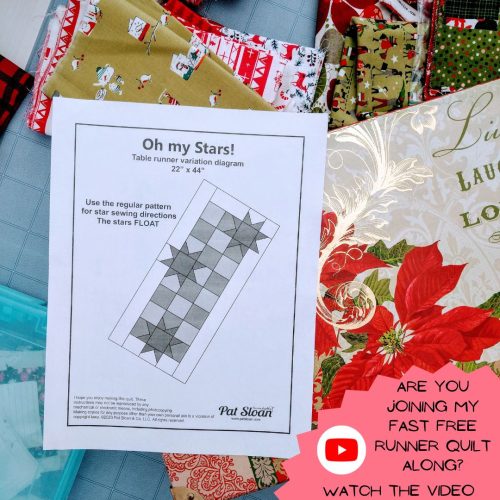
** FREE Table runner layout for Oh My Stars **
Watch my video for ALL the details
** FREE Crib Size layout for Oh My Stars **
Watch my video for ALL the details
- Video making this quilt https://youtu.be/goOhnyBIiT0
- Download 2022 Oh my Stars baby size
- Updated some of the border lengths 5/9/2025
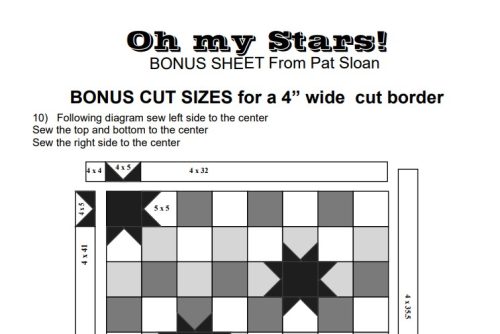
This download is to do a wider border so those star points also float

This download is the layout using just ONE charm pack + fabric
also 2 videos showing the process of laying out the fabric for this version (video #2 on Oct 5)
****************

83 Responses
I would like to buy the extended sizes for Oh My Stars, but do not have Pay Pal. Is there another option?
I am struggling to understand the instructions, specifically the points in the borders. I love the concept. I am working on the queen size and the points at top of the queen quilt top with borders layout says that there is a border with a 3″x63.5″ strip. ON the furthest left side there are 2 points but the right side of point will have 3 layers of fabric, do I clip the middle part? I mean I can’t very well clip the bottom part. And then there appears to be another set of points at the very right side. Do I put those points on the 63.5″ strip or do I put it on the 3″x9.5″ strip. Also, the strips that are more than 42/44″ fabric, I don’t see instructions on how to connect strips in order to make the lengths you require. Do I just do it like when I am making my binding? Anyway, if you could answer those questions, I would appreciate it.
I have a question about usage. A friend and I are starting a cutting program for quilt guild members with arthritis issues and are no longer active in our charity quilt program. So we are looking for patterns that are relatively simple baby quilt ideas and not a lot of sewing and then have to cut, for instance HSTs. So we are cutting the main pieces. We feel like the Oh My Stars baby is a great one to fall in that category. We wouldn’t be photocopying in mass. Just three or four kits for them each month and it helps us use fabrics in our own stash to make up the kits. (We have very healthy stashes). But most of these members are older and we feel that asking them to go online and do a download of this pattern might be overwhelming for them. So we are seeking permission to print out one download and copy it for them. Is this a possibility? I’ve written a book myself (in the stenciling discipline) and I understand and respect your copyright on this pattern. We will not be making money, but it will connect to you with your information intact. Thank you for your attention to our request. Kindest regards, Lyn (BTW love watching you often and your infectious laugh is a bright part of my day.)
I would like to purchase the larger size patterns but the link says not found. Help! I really like this pattern!
Your add on link for additional sizes no longer works 🙁
Pat – URL link to purchase larger sizes is not working. Where can I get it please? Thank you.
I just started watching your channel not long ago. You are such a sweet person.
Please enter me for the draw on the Olisso (sp?) iron
I watch your UTube video everyday. I’ve learned a lot about fabric selection.
did not quilt along but… arthritis let me do an Oh My Stars Quilt later. FUN !
I would love to purchase the extended sizes but do not have PayPal. Is there another option for purchase?
Just bought the pattern. Enjoyed looking at all these great examples. I would like to do one with photos of my SIL’s dog in the middle of the stars. Has anyone done that? Any photos available of quilts with non-traditional centers to the stars? Wondering how to make the photo stars “pop”. Also, one of my photos is bigger than a charm square. Is there a variation that might include one bigger star?
Just entering to get the new jellyroll book and jollybar, Love your videos. Take care and have a good day.
Thank you, looking forward to trying this. Might not get to it right away but I will work on it.
I just ordered this pattern and when I downloaded it, it is not in English and is useless to me. How can I get it in English?
I don’t know how to download it so I hand copied it.
I can’t download the free pattern from here. How would I find the free download of the Oh My Stars?
Thank you.
Printed the pattern, thank you! So helpful that you include a lot of Sloane Zoneers’ FO’s. It’s helping me imagine my stash into pattern.
I keep making this pattern over and over.
Why? I prefer simple patterns that allow gorgeous fabric to really shine. And this is one of my go-to patterns
I’ve been hoarding the Grand Canal line’s charm packs and yardage for maybe 6+ years and I am ready this summer to get to work. (or play 🙂 )
I love your videos!
Whenever you giggle, it just makes me smile!
Hi Pat
I hope I am in the right place to comment for Edytas book! I love her fabrics and have 5 containers of them. Just need to decide in my mind which of her beautiful quilts to make with them!!
Liz
Love this pattern, thank you! How can I make a full size Oh My Stars?
A while back I watched your you tube video on this quilt and you showed some different color ways that you could use. I believe it was in greys and was like an outdoorsy or rustic pattern but I cannot find the exact video now or remember what the fabric was called. I believe it might have been a layer cake or something like that. Would you know what I’m talking about ?
My first Oh my stars are made into tab top curtains.
I love jolly bars and I would do an “Eat Your Fruits & Veggies. My 6 1/2” square is my favorite too.
I cannot load the Oh My Stars pattern any more and I’m missing the instructions for the border
I worked as a special Ed teacher with behavior disordered students. I had a wonderful paraeducator who would say “Oh, my stars!” every time one of them would do or say something inappropriate (fairly often!). I’m going to make her this quilt to thank her for 10 wonderful years.❤️
I made this in Halloween prints for my daughter in law and she loved it! I want to make it again in other sizes and prints. How do I make it for larger sizes?
Dear Pat, I downloaded an Oh MY Stars wall hanging but I never got to finish directions on how to finish . I goy as far as cutting 1 6×32 inchstrip for hanging sleeve and 4 -3×42 inch strips for binding. Is there any way you can send me the rest of the directionsto finish the hanging. its 33 inch square . its just 1 flag made from striped materils.My e-mail address is
Hi Pat, Could you do this quilt with 10″ squares?
What would the smaller squares measure? Th ones in the border?
Thanks!
Renee
Thanks Pat for the pattern. I follow you and so enjoy your time with us. Looking forward to June Quilting. I have my panel. Thanks from Canada
I made this last night but it came out to be 13″ after trimming. I did something wrong because my star points were a little off. . Kind of discouraged but told myself that it is handmade and I will get better with experience. lol Love your videos.
I love this pattern and purchased to make larger sizes. Excited to get started and have read the instructions but have a question which will seem very silly to all those experienced quilters…which I am not! When cutting the 5 inch and 3 inch squares am I to cut exactly that size or allocate for seam allowances… for instance, 5 and 1/2 inch for the 5 inch square and 3 1/2 inch for the 3 inch square? Sorry, I tend to overthink things. Thank you!