
FIRST…
![]()
Did you miss my announcement of the next Block Wednesday?
CLICK HERE for Winter Fun! Details
You can either call this a public service announcement or 'Reality Quilting'.. either way.. I'm about to show you real life happening right in my studio.. are you ready?.. it might get a little.. scary…. But.. it's necessary…
Sometimes we just do NOT take the time to be sure our tools are in the best condition. You are cutting with your blade that you KNOW is dull, it is hard to push, it must have a nick because you are cutting places it missed, and you .. just.. keep .. using it…
DISCLAIMER — names have been changed to protect the innocent…. I believe Sofia did this.. right here in my studio.. let's see what happened…
After numerous times of the blade not cutting all the places I … I mean..Sofia decided to take a look.. maybe change that blade even!
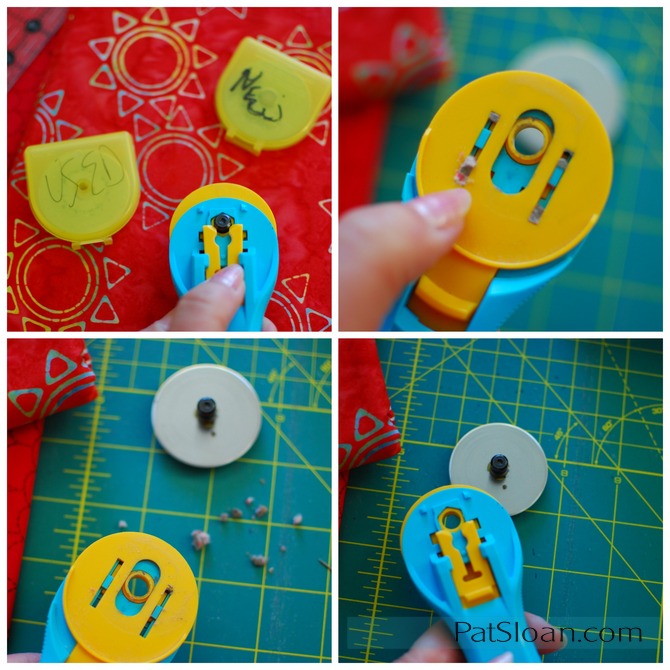
Being a very careful quilter she has a container of OLD blades and NEW blades clearly marked.
This Olfa rotary cutter is BRILLIANT as it takes all the guesswork and frustration out of changing the blade.
- Turn it over and slide down that yellow part so the screw holding the blade on is now free
- let the blade with the cover drop to the table and then turn it over
- OH MY… horror!!
- There is a THREAD MAT in those grooves
- I needed.. I mean… Sofia needed to get a needle to pry all the dust out
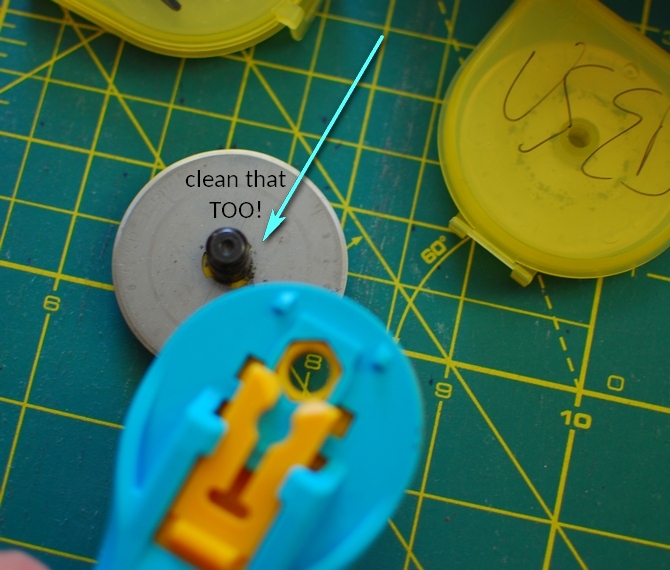
Next you will dump off the old blade and put a new one on that cover
BUT.. be sure you clean the crud off there too!!
ewwwwww this is a dirty job!
Article continues below this Ad
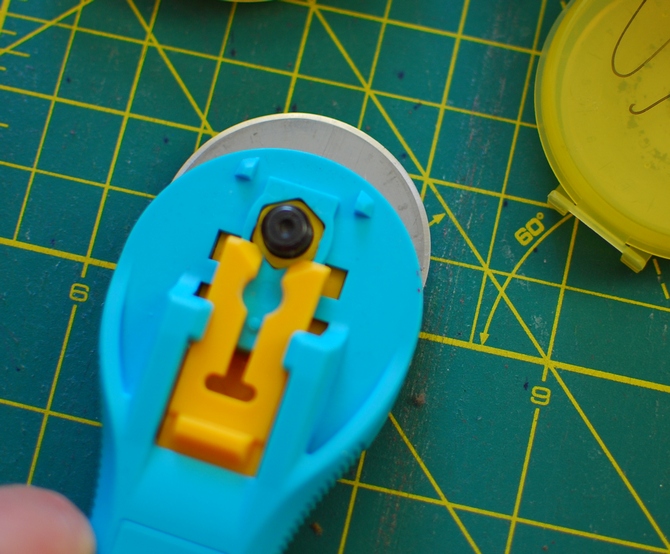
Now the BRILLIANT part continues!
Just lay the handle on top of the blade and cover, the screw goes back into place
Slide the yellow holder UP to hold in the screw

You are ready to rock and roll!!! New Blade, Clean Rotary cutter!
How often do you find yourself doing the same thing as Sofia and I?
Now do yourself a huge favor and buy one
- Purple ones HERE, Aqua HERE, more sizes HERE. They may have a slightly different blade changing
- New blades, of course! Get those HERE!
- Get my FREE Notices and you will be the first to know when I write something useful, funny or useful AND funny.. wink!
-

29 Responses
that’s great!
I slide it between my thumbs…being very, very, careful.
For the last 20 some years I thought those suckers was just take off the blade wipe off whatever was there and put the new blade on and start cutting. why does no-one say to go further?I have never heard anyone talk about going further!I went and looked at my favorite cutter and it was pretty good so by some chance I must have done ok but really we all need to share this!!
I never even thought about this. Thanks for a great tip!!
It was working
I keep until the container is full then throwaway the container. Rather than trying the find something safe to put just one blade into so it can thrown away
Can’t wait to start tks Pat
Dos anyone have a safe way to separate two blades that are held together by the oil?
Don’t forget to add a drop of lubricant also.
Thanks Pat for the tip! I kept changing blades and threw my cutters out as I was so frustrated. Recently, I tried to clean it and didn’t know that this is a common thing. I, too, had two blades in a few times. They are so thin and sharp. It is hard to know if you have one or two in.
Take photos of taking cutter apart so you know how it goes back together again
I have a blade sharpener that I use to get more use out of the blades. It does not fix nicks in the blade from hitting pins or rulers but we’ll worth the investment for me. Don’t forget a drop of oil after cleaning your cutter. Helps it roll smoother.
OMG, I just changed my blade Sunday and couldn’t believe the crud that was in it. Who knew???
I keep old blades to cut batting to use in machine embroidery so that I don’t dull a new blade.
Pat, thank you for this tip/reminder! I love my Olfa Rotary Cutters, especially the 40th Anniversary Rotary Cutter!!
Oh! Bev. Thank you!!! I thought I was the only one that ever did that. I was cutting cotton fabric, and could not figure out why I was having so much trouble. Didn’t shred the fabric, just did not want to cut it with less than
“HULK” power effort from me. That can get very tiring after awhile!! Thanks Pat for the refresher andBev for letting me know I am not alone!!!
Thanks for the reminder Pat! I love my Olfa and how easy it is too change blades.
I never even thought about it! Thanks, Pat!
I couldn’t figure out why my brand new blade was shredding my fabric. I thought it was just the wool. Next project same thing. I took the cutter apart and realized that when I taken the blade out of the package there was another blade stuck to it. I had put two blades on. The oil had them stuck together and since it was a multi pack I hadn’t count them.
I’m surprised hat you were able to close your rotary cutter with that much lint in it. I discovered years ago when I couldn’t get a rotary cutter to fully open or close that the problem was the lint packing in. Sometimes a drop of a very light oil (sewing machine oil)helps also. Especially if the blades have been in for a while and don’t have the oil left on them anymore.
I do some paper piecing and usually cut my own templates, I use the old rotary blades when I cut paper that way I am not dulling a new sharp blade. They usually have enough of an edge to cut paper. I also give them to my husband to use in his workshop so he quit stealing my good blades to do work down there!
Happy quilting!
no I don’t think so, unless you are a scrapbooker too and might use a rotary cutter for paper. I have heard of DIY’ers who use them for cutting paper shelving and other stuff they don’t want to use scissors on.I just keep them in a container and when the container is full I toss them and then no one will get cut.
Is there a reason to keep old blades?
Good advice for a beginning quilter. Will be careful and make sure I do follow your directions.
You have no idea how you saved my er friend’s rotary cutter!
She was going to throw hers out! Wow! It works like a dream!
Thank you so much!!
Karen er OOGA!
Thanks Pat for the rotary blade lesson. Last time I changed the blade in mine, I put it back together backwards! Couldn’t figure out why it wouldn’t work. After a deep breath, I figured it out.
I clean my cutter every time I change the blade. Been doing that for years.
I’m a scrappy quilter, when I start a new project I change the needle in my machine and change the rotary blade. Makes cutting out the quilt so easy peasy. Thanks Pat for an awesome tip!
A great tip! Thank you!